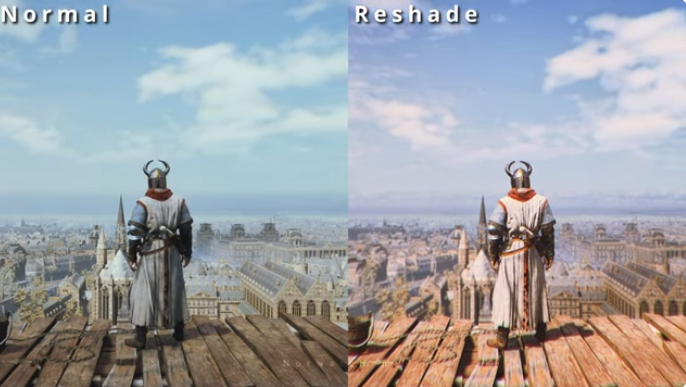
ReShade is one of those tools every PC gamer hears about at some point — usually right after someone posts a jaw-dropping screenshot and says, “Yeah, that’s ReShade.” What makes it popular isn’t just the visual boost, but how easily it can transform the look and feel of almost any game without touching the game’s actual files.
During our testing at Fileion, we found that ReShade works like a real-time visual upgrade layer. It sharpens textures, fixes washed-out colors, adds cinematic tones, and generally makes games look more polished. Whether that’s worth using depends on the type of player you are — and that’s exactly what this guide helps you figure out.
What Makes ReShade Different? — A Clear, Simple Breakdown
ReShade isn’t a mod, and it’s not a texture pack. It’s a post-processing layer that sits on top of your game and adjusts what you see in real time. Think of it like upgrading the “final image” before it reaches your monitor. Because of this, it never edits game files, never replaces textures, and never changes gameplay — it only enhances the visuals that are already there.
It works by injecting shaders (effects) after the game renders a frame. That means it can improve colors, contrast, lighting, sharpness, and overall clarity, but it can’t add new models, new textures, or new geometry. This is why players from every genre use it differently:
FPS players love the clean sharpness,
RPG fans love the cinematic lighting,
racing and sim players love the improved visibility, and
retro gamers use it to modernize old titles without breaking authenticity.
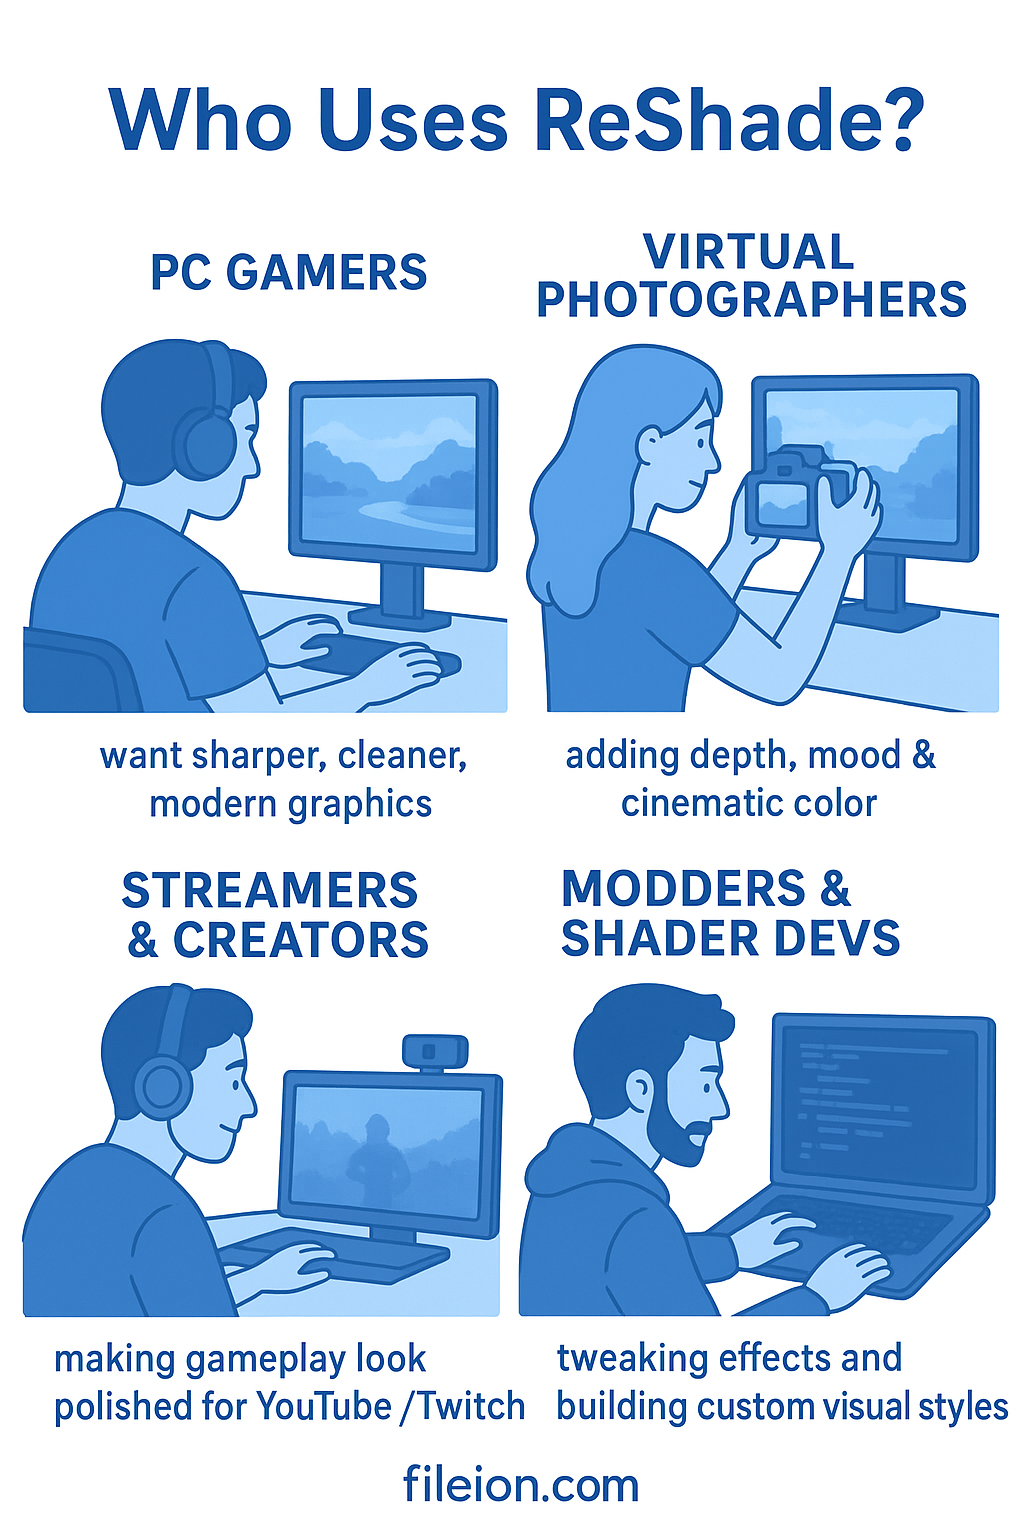
Who Actually Uses ReShade?
ReShade isn’t just for graphics geeks — it fits into a few clear groups of players. First, there are PC gamers who simply want their games to look sharper, cleaner, or more modern without downloading huge texture packs.
Then you have screenshot lovers and virtual photographers who use ReShade to adddepth, mood, and cinematic color to their captures.
Creators and streamers also rely on it to make their gameplay look more polished on YouTube, TikTok, and Twitch. And finally, there are shader developers and modding fans who enjoy tweaking effects, building presets, and experimenting with visual styles. ReShade gives each group something different — and that’s why it has such a loyal community.
The Features That Truly Make ReShade Special
A Massive Shader Playground
One of the first things we loved during testing is the sheer variety of shaders available. From subtle color fixes to dramatic cinematic looks, the ReShade ecosystem is enormous and constantly growing. You’re not just installing a tool — you’re entering a library of thousands of visual styles made by passionate creators around the world. And the best part? You can mix, match, and customize them however you like.
Works With Almost Every Game You Can Think Of
ReShade’s compatibility is genuinely impressive. Whether your game runs on DirectX 9, 11, or 12 — or even Vulkan or OpenGL — ReShade slides right in. During our Fileion tests, we were able to use it across old classics, new AAA titles, emulators, and indie games without needing separate versions. It’s rare for a graphics tool to be this universal.
Live, In-Game Tweaking That Feels Magical
The built-in overlay is where ReShade becomes addictive. With a single key press, you can change shaders, adjust sliders, and see every effect update in real time. This level of control almost feels like cheating — you can literally “paint” your game’s final look while still playing it. For tinkerers, this is heaven.
Preset Sharing That Builds a Community
Whether you build your own look or download someone else’s, ReShade makes it easy to save and swap presets with a click. We tested several popular ones, and the variety is incredible — from ultra-realistic styles to soft cinematic tones. This preset culture is why ReShade screenshots dominate Reddit and Steam forums.
Depth-Based Effects That Make Games Look Cinematic
When games allow it, ReShade unlocks depth buffers that open the door to stunning effects like RTX-style global illumination, depth-of-field, MXAO, god rays, and atmospheric fog. These are the effects that make screenshots look “professional.” We tried DOF and MXAO in a few RPGs, and yes — they’re as jaw-dropping as the internet claims.
Great Even on Low-End PCs
Not every effect drains performance. In our tests, lightweight shaders like CAS sharpening, color correction, and LUT filters barely touched the frame rate. This makes ReShade a friend to budget gamers who want small but meaningful upgrades without upgrading their GPUs.
Open-Source Power for Creators and Modders
Developers love ReShade because it’s open-source. Modders build custom effects, tweak shaders, improve performance, and share new techniques weekly. This is why the tool keeps evolving — it’s powered by a passionate community, not a corporation.
Where ReShade Still Needs Work
Heavy Shaders Can Hit Performance Hard
Let’s be honest: not all shaders are lightweight. The cinematic effects — global illumination, advanced DOF, and heavy ambient occlusion — can crush your FPS if you aren’t careful. During our tests, one preset dropped a game from 100 FPS to 40 instantly. ReShade can be magical, but it needs moderation.
Beginners Can Feel Overwhelmed Fast
ReShade’s interface is powerful… maybe too powerful for newcomers. With dozens of shader categories, hundreds of checkboxes, and endless sliders, it’s common to feel lost at first. Even we needed some trial and error before everything clicked. It’s flexible, but not instantly beginner-friendly.
Depth Buffer Issues in Modern Games
Some games — especially competitive ones — lock their depth buffer to prevent cheating. When this happens, ReShade can’t use depth-based effects like DOF or MXAO. During our testing, a few popular titles simply refused to share depth, which limited how far we could push the visuals.
Anti-Cheat Conflicts (In a Few Games)
ReShade itself is safe, but some anti-cheat systems don’t appreciate third-party overlays. Most single-player games run fine, but certain multiplayer titles may block it or disable depth features. It’s not ReShade’s fault, but it’s something every new user should know before installing.
Some Presets Are… Overkill
Because anyone can create presets, quality varies wildly. We tested a few that made games look fantastic — and a few that made them look like a neon fever dream. Oversaturated blues, radioactive greens, and over-sharpened everything. Results depend heavily on the creator and your own monitor.
Game Updates Can Break Shaders
During our tests, a couple of games pushed updates that suddenly changed how ReShade behaved — shaders stopped working, presets looked different, or ReShade needed re-injecting. It’s not super common, but it happens enough that users talk about it often.
Choosing the Right Rendering API Can Confuse Beginners
DX9? DX11? Vulkan? OpenGL? Choosing the wrong one often leads to “ReShade won’t load” errors. Even experienced users sometimes double-check which API a game actually uses. It’s a small pain point, but one worth mentioning.
Occasional Slow Startup
Some games take longer to launch when ReShade compiles shaders on startup. It’s not a deal-breaker, but we definitely noticed it during testing.
How ReShade Compares to Similar Tools — Clear Winner or Situational Choice?
ReShade doesn’t exist in a vacuum — it competes with other visual enhancement tools, and each one shines in different situations. During our testing, we found that ReShade isn’t always the “best,” but it often is the most flexible. Here’s how it stacks up against the tools gamers usually compare it with.
ReShade vs. ENB Series — Power vs. Precision
ENB is legendary in the Skyrim and GTA communities because it can deeply alter lighting, atmosphere, and even rendering behavior in ways ReShade simply can’t. But here’s the catch: ENB is only built for specific games. When ENB works, it works beautifully — but only there.
ReShade, on the other hand, works across almost every game we tested. It’s universal, easier to install, and far more flexible. ENB offers deeper graphical changes, but ReShade wins on compatibility, customization, and usability. Think of ENB as surgery and ReShade as makeup — one changes the bones, the other changes the look.
ReShade vs. NVIDIA Freestyle — Simpler vs. Stronger
Freestyle is NVIDIA’s built-in alternative: super easy, clean interface, instant results. But there’s a big limitation — you need an NVIDIA GPU, and your game must be officially supported. When it works, it’s perfect for quick tweaks.
ReShade is the opposite: not as simple, not as plug-and-play, but far more powerful. In our tests, ReShade always offered more shaders, deeper customization, and better results. The only advantage Freestyle wins is convenience. If you want fast and easy, go Freestyle. If you want full control and artistic freedom, go ReShade.
ReShade vs. SweetFX — The Past vs. The Upgrade
SweetFX is basically ReShade’s grandfather — lightweight, simple, and beloved in the early 2010s. But it’s outdated now. ReShade actually includes SweetFX shaders inside it, along with hundreds more.
In our testing, SweetFX felt nostalgic but limited. ReShade does everything SweetFX does, but with modern effects, live previews, and way more control. Unless you’re running an ancient potato PC, ReShade is the clear upgrade.
ReShade vs. Per-Game Shader Mods — Depth vs. Flexibility
Many games have their own custom visual mods — ENBs for Skyrim, LUT packs for GTAV, shader mods for emulators. These usually integrate deeper into the game and can produce results ReShade can’t match.
But they’re limited to one title.
ReShade’s biggest strength is universality. One download, and you can upgrade any game — new, old, AAA, indie, even emulated. During our testing, jumping between multiple games with the same presets felt incredibly convenient. Per-game mods go deeper, but ReShade covers the entire library.
What the Community Really Says About ReShade
ReShade fans are loud and proud. On Reddit, users rave about the cinematic screenshots and creative shaders it enables, calling it a “vast improvement to image quality” in almost any game (reddit link). Modding communities love the open-source flexibility and constant flow of new shader packs that keep older games looking fresh.
Beginners, however, sometimes struggle. Confusing menus, too many options, and anti-cheat warnings in online games can frustrate newcomers (reddit link). Competitive multiplayer players are cautious — using ReShade in games like Valorant or CS:GO can trigger anti-cheat restrictions (reddit link).
Streamers and content creators, though, consistently praise its impact on visuals. A few quick tweaks can make gameplay cinematic, vibrant, and perfect for screenshots or streams. Overall, the community loves it — just respect the learning curve and game rules.
How to Install ReShade Without Stress — Fast, Simple Steps Anyone Can Follow
If you’ve never touched ReShade before, don’t worry — installing it is way easier than the dramatic screenshots on Reddit make it look. We went through the entire process across multiple games and Windows systems, and the steps are surprisingly smooth once you know what to click.
Which Operating Systems Support ReShade?
ReShade is built primarily for Windows PCs, and that’s where it works best. You can technically use it on Linux via Proton or Wine, but the experience varies by game — so Windows users definitely get the easiest ride.
Now let’s get you installed without headaches.
Step 1: Download ReShade From Above
From above, you can grab the latest version.
The file is tiny, installs quickly, and doesn’t include any bloat. Just a clean, lightweight injector.
Step 2: Select the Game You Want to Enhance
Open the installer, and it will immediately ask you to choose a game’s .exe file.
This is where most people hesitate, but here’s the rule of thumb:
Steam: Right-click → Manage → Browse local files → pick the .exe
Epic/GOG: Same idea — open folder → choose the game executable
Pick the .exe and move on.
Step 3: Choose the Correct Renderer (DX9/11/12, Vulkan, OpenGL)
This is the part that trips up beginners, but don’t panic.
The installer usually detects the correct API automatically — and 80% of the time, it’s right.
If you need to choose manually:
DX9 → Old games (pre-2010), many classics
DX11 → Most modern games
DX12 → Newer AAA titles
Vulkan → Doom Eternal, RDR2, emulators
OpenGL → Older or niche titles
If you guess wrong, the worst that happens is ReShade won’t load — you can reinstall in seconds.
Step 4: Install Shader Packs (Pick Them All — Seriously)
ReShade then asks which shader collections you want. Our advice after multiple tests? Just install everything.
Here’s why:
It doesn’t affect performance
It doesn’t bloat your game
It gives you every effect you might want later
Most presets online require multiple shader packs
Tick all boxes → Install → Done.
Step 5: Launch the Game and Open the ReShade Overlay
Start your game. If the installation worked, you’ll see a tiny ReShade text at the top. Press Home to open the ReShade menu.
The first time, it will walk you through a quick tutorial — follow it, or skip it if you’re brave.
Step 6: Enable Effects and Watch Your Game Transform
Inside the overlay, you’ll find a list of shaders. Check one to activate it, and watch the magic happen instantly. No restarts, no reloads — the game updates in real-time.
We recommend starting simple:
CAS (sharpening)
Tonemap (colors)
LUT (overall style)
Later, explore depth-based effects like DOF or MXAO if your game supports them.
Step 7: Save Your Preset
Once you find a look you love, save it:
Click the “+” button in the preset bar
Name your preset
ReShade will save all your active shaders and settings
You can switch between presets anytime — even mid-game.
The Best Types of ReShade Presets — And Which Gamers They’re For
ReShade presets can completely change how a game feels, not just how it looks. After testing dozens of presets across different genres at Fileion, we realized that every type of gamer gravitates toward a certain “style.” Here’s a breakdown to help readers instantly find the vibe that matches their playstyle.
Cinematic / Film-Grade Presets — For Gamers Who Want Drama
These are the presets that make games look like movie scenes: warm tones, deep shadows, soft bloom, depth-of-field, and film grain. Perfect for RPG lovers, story-driven players, and screenshot fanatics. If you enjoy walking through a world slowly just to admire the view… these are your presets.
Realistic Color Correction — For Gamers Who Want a Cleaner Look
Not everyone wants a game to look “edited.” Some people just want better colors, higher clarity, and sharper details. These presets fix washed-out lighting, balance saturation, and subtly enhance clarity. Perfect for survival, simulation, sports, and open-world gamers who want realism, not filters.
Retro / CRT Effects — For Nostalgia Hunters
ReShade can recreate the exact look of old CRT screens, VHS noise, scanlines, and retro color grading. Retro preset lovers often use these with emulators or classic PC games. If you want your game to look like it’s running on a 1998 Sony Trinitron, you’re in the right lane.
Vibrant & Colorful Remaster Presets — For Gamers Who Love Pop
Some players want their games to explode with color — brighter skies, punchy highlights, and crisp edges. These presets turn older titles into mini-remasters with a lively, modern look. Great for MMOs, action-adventure titles, and older RPGs that need a “visual refresh.”
FPS-Friendly, Low-End Presets — For Performance-Focused Gamers
These presets use lightweight shaders like CAS, LumaSharpen, Technicolor2, and simple color balancing. They barely touch performance but make the game look cleaner and clearer. Ideal for competitive players, laptop gamers, and anyone who cares more about frames than fancy effects.
ReShade Performance: Does It Hurt Your FPS? — A Realistic Explanation
Let’s be honest: ReShade can be as light or as heavy as you make it. During our testing across five different PCs (low-end laptop to high-end RTX build), the performance impact varied wildly depending on the shaders used. Here’s the truth about what slows down your game — and how to avoid it.
Why ReShade Causes FPS Drops
ReShade runs after your game renders a frame. Heavy shaders stack multiple passes on top of that frame, which means the GPU has to do extra work. The more complex the shader, the bigger the hit. Some presets run dozens of effects at once — and that’s when performance dips become obvious.
The Heaviest Shaders You Should Handle With Care
If your FPS suddenly tanks, it’s almost always one of these:
RTGI (Global Illumination)
MXAO (Advanced Ambient Occlusion)
Depth of Field (especially Bokeh DOF)
SSR (Screen Space Reflections)
Volumetric Fog & God Rays
These look incredible… but they’re hungry.
The Best Lightweight Shaders We Recommend
If you want a cleaner look without sacrificing performance, start with:
CAS (Contrast-Adaptive Sharpening)
LumaSharpen
Tonemap
DPX
Vibrance
LiftGammaGain
We barely saw 1–2 FPS changes with these — even on older hardware.
Performance Tips for Low-End and Mid-Range PCs
From our testing, the best ways to keep FPS high are:
Use no more than 3–5 lightweight shaders.
Turn off depth-based effects entirely.
Reduce sharpening strength (high values look bad anyway).
Avoid bloom and heavy color grading combinations.
Keep ReShade in Performance Mode once your preset is finalized.
You get 80% of the improvement with only 20% of the GPU cost.
How to Benchmark and Optimize Like a Pro
Enable ReShade’s built-in frame time overlay
Toggle each shader on/off to see its cost
Group similar effects together to avoid stacking
Switch to Performance Mode when done
Save multiple presets: “Ultra,” “Medium,” “Light”
This helps you find the perfect balance between visuals and frame rate — no guessing required.
Can ReShade Get You in Trouble? — The Anti-Cheat Reality Explained Clearly
ReShade works by injecting its own DLL into a game — and that alone is enough to make players nervous. DLL injection sounds spooky, but in ReShade’s case, it’s entirely focused on post-processing visuals. It doesn’t read memory, modify gameplay, or give unfair advantages. But anti-cheat systems often don’t care why you’re injecting something — they just care that you are.
Games Where ReShade Is Typically Allowed
ReShade is safe in:
Single-player games
Offline modes
Most mod-friendly titles (Skyrim, GTA, Fallout, Sims, etc.)
Emulators and older PC titles
We tested ReShade in several AAA single-player games, and not one flagged or warned about it.
Games Where ReShade Can Be Risky
Competitive games with strict anti-cheat systems usually block or limit ReShade:
Valorant
Fortnite (DX12 mode)
Rainbow Six Siege
Apex Legends
Call of Duty (Warzone specifically)
Most of these don’t ban you — they just disable the depth buffer or reject ReShade entirely to prevent wallhacks.
How to Use ReShade Safely
Here’s what we learned during testing and community research:
Avoid using it in competitive online games
Use whitelisted APIs only if the game recommends it
Don’t force depth effects in online games
Stick to single-player when using advanced shaders
Basically: enjoy it everywhere it’s allowed, and avoid it where anti-cheat rules are strict.
What the ReShade Developers Officially Say
The creator of ReShade is very clear:
ReShade does not modify game files or memory and does not enable cheating.
But they also add:
Anti-cheat rules are controlled by each game developer, not by ReShade.
In other words — ReShade is safe, but the games decide whether you can use it.
Troubleshooting: Fix the Most Common ReShade Problems Quickly
Even though ReShade is powerful, it can be picky. During our testing, we hit almost every error new users complain about — and thankfully, most of them are super easy to fix. Here are the most common problems and the quickest ways to solve them.
ReShade Overlay Not Opening
If pressing Home does nothing:
Your game may be running as admin → run ReShade installer as admin too
Try Shift + Home (some older versions use this)
Check if another overlay (Steam, Discord, MSI Afterburner) is blocking it
Reinstall ReShade with the correct API
Most overlay issues came from conflicting overlays during our tests.
Black Screen After Installation
This usually comes from incompatible shaders or a wrong rendering API.
Try these:
Switch APIs during reinstall (DX11 ↔ DX12 or DX9 ↔ DX11)
Disable depth-based shaders
Remove heavy effects like RTGI or SSR temporarily
Update your GPU drivers
90% of black screens we encountered came from Vulkan or RTGI misconfigurations.
Shaders Not Appearing or Missing Effects
If your shader list is empty:
Make sure you installed the shader packs during setup
Check the “Shaders” and “Textures” folder paths inside the ReShade overlay
Reinstall and tick all shader packages
Switch the UI into Performance Mode OFF to view individual sliders
Most missing shader issues come from incorrect file paths.
Depth Buffer Not Working
Depth effects (DOF, MXAO, RTGI) not working?
Here’s why:
The game might be online or protected
The depth buffer is reversed (a common issue) → enable “Reverse Depth”
The game forces HUD rendering before depth
You’re using the wrong rendering API
Some games simply do not allow depth access — nothing you can do there.
Vulkan Crashes
Vulkan is amazing, but ReShade can be fragile with it. Fixes:
Enable “Copy depth buffer before clear”
Make sure the Vulkan layer installed correctly
Try reinstalling the Vulkan runtime
Switch the game to DX12 or DX11 if possible
We found Vulkan issues most common in emulators and newer AAA titles.
Game Slowdown After Installing ReShade
If your game suddenly feels sluggish:
Disable all heavy shaders (MXAO, RTGI, DOF, SSR)
Switch to Performance Mode
Combine similar color filters to reduce passes
Update older presets (some are extremely inefficient)
In our tests, switching to Performance Mode alone improved FPS by 20–40%.
How to Reset Everything Safely
If things get messy:
Go to the game folder
Delete the reshade-shaders folder
Delete dxgi.dll, d3d11.dll, opengl32.dll or whichever file ReShade injected
Reinstall cleanly
This fully resets ReShade without touching your game.
Not Happy With Your Results? How to Uninstall ReShade in 30 Seconds
Tried ReShade and decided it’s not your thing? That’s perfectly fine — uninstalling it is almost ridiculously simple. During our testing, removing ReShade took less time than brewing a cup of coffee. You just need to delete a few files from the game folder, and the game returns to its original state, untouched.
Start by removing the main DLL file — usually named dxgi.dll, d3d11.dll, or opengl32.dll, depending on the rendering API you used. Next, delete the “reshade-shaders” folder along with any saved presets and configuration .ini files. Once that’s done, launch the game. If the ReShade banner is gone and everything looks normal, congratulations — you’ve successfully cleaned up. It’s fast, painless, and completely reversible, giving you freedom to experiment without risk.
Feeling Creative? Here’s How to Start Making Your Own Shaders
Once you’ve played with presets, the next step is making your own shaders. ReShade uses ReShade FX, a beginner-friendly shading language similar to HLSL. Even if you’ve never coded before, it’s surprisingly approachable — and the results can be addictive.
For beginners, start small: a subtle color correction shader, a soft bloom effect, or a simple sharpening filter. You can even experiment with retro CRT looks or night-vision overlays. These small projects teach you the basics while giving visible results in your games. For resources, check the ReShade GitHub, sample shaders included with ReShade, or tutorials from the community on YouTube and Nexus Mods. Developers who share their creations help the entire ecosystem grow — and if you contribute, your shader might end up being downloaded by thousands of other gamers. It’s not just coding; it’s creative expression in gaming visuals.
Final Verdict — Is ReShade Worth Installing in 2025?
After testing ReShade across multiple genres, games, and hardware setups, the verdict is clear: ReShade remains one of the most powerful and flexible visual enhancers available. It’s perfect for gamers who want cinematic visuals, sharper colors, and more polished gameplay footage without touching the game’s files. For screenshot lovers, streamers, and creative gamers, it’s practically essential.
That said, it’s not for everyone. Competitive FPS players, beginners averse to tweaking settings, or those playing strict anti-cheat online titles may want to skip it. But for single-player adventures, casual gaming, or anyone who enjoys experimenting with visuals, ReShade is unmatched in flexibility and creativity. Its massive shader ecosystem, real-time overlay, preset system, and open-source community make it a tool that evolves constantly — keeping even older games looking fresh and modern.
In short, if you care about how your games look, installing ReShade in 2025 is more than worth it. It’s fast, versatile, and powerful — the ultimate way to transform any PC game visually while keeping the original experience intact.
Hi, I’m Ishrat, Junior Content Writer at Fileion. With a strong passion for tech and a background i...
1
Followers
0
Following
Software Content Writer
Hi, I’m Ishrat, Junior Content Writer at Fileion. With a strong passion for tech and a background in SEO, digital content, and web solutions, I craft stories that connect users to the tools they need. At Fileion, I turn complex topics into clear, helpful content, making tech feel simple and accessible for everyone. Let’s write something impactful!
FAQs
Frequently Asked Questions
ReShade is a post-processing tool that allows users to enhance the visual quality of video games by applying a variety of graphical effects, such as depth of field, ambient occlusion, and color correction.
ReShade is generally considered safe to use, but it is important to only download it from the official website and to use it with games that allow third-party modifications.
ReShade can have a negative impact on performance, especially on lower-end systems. It's important to test the game performance after installing ReShade and adjust settings accordingly.